Monday 21 October 2013

Making your blog interesting

The templates that are provided by Blogger are basic. They need YOU to give it a bit of personality. If you can code you can go into the HTML and begin working with your Style Sheet. If not, use the simple tools provided. Let's look at some of them:

1. Go into the dashboard, and on the left hand side you'll see Template. Click on it.


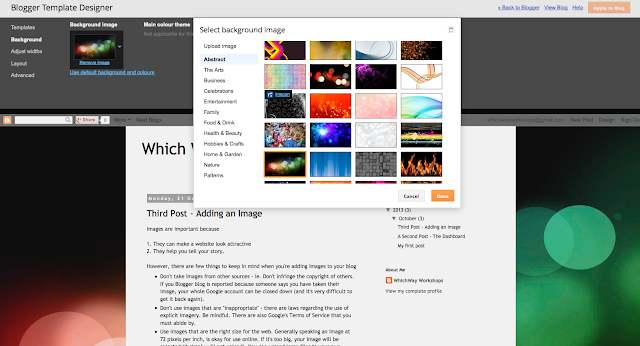
2. Add a background, selecting from the images that are already provided, or uploading your own.

3. Adjust the widths of the body and the sidebars of your blog. (I've adjusted the width on this blog to allow for the images to fit X-Large)

4. Choose a layout. This blog is currently a centre body and a right-hand sidebar. You can change your layout if you like. When you first develop your blog, the sidebars probably won't be that important. But once you get started and are adding more content, you'll find yourself spending hours thinking about the best layout for your blog.

5. Advanced -  When you're well on your way, you can starting adjusting the colours, sizes and fonts that your blog uses. 


6. Templates - This blog is currently using the simple template, you can easily swap between templates. 

3.

Third Post - Adding an Image

Images are important because

1. They can make a website look attractive
2. They help you tell your story.

However, there are few things to keep in mind when you're adding images to your blog
  • Don't take images from other sources - ie. Don't infringe the copyright of others. If you Blogger blog is reported because someone says you have taken their image, your whole Google account can be closed down (and it's very difficult to get it back again).
  • Don't use images that are "inappropriate" - there are laws regarding the use of explicit imagery. Be mindful. There are also Google's Terms of Service that you must abide by.
  • Use images that are the right size for the web. Generally speaking an image at 72 pixels per inch, is okay for use online. If it's too big, your image will be rejected (it simply will not upload). You can upload large files to your own personal blog when you're paying for your own site, but when you're using Google's free-of-charge service, you will be limited by the file size.
To add an image - go to Insert Image. The screen will ask you where you want to get the image from. You can insert a URL, or alternative an image from your files.

Choose a file and click Add Selected
You can do some basic formatting. You can align the image left, right or centre - the text will WRAP around the image where possible. You can also include a small, medium, large or extra large image. Be mindful that small images will not enlarge easily. 

Note: when the above images were added, I selected "Extra Large". The impact of this was that the image was larger than the width of the BODY of the post. It's overlapping into the sidebar. This is not a good look and I either need to 1) adjust the width of the image or 2) adjust the width of the post.


A Second Post - The Dashboard

You will need to become familiar with the dashboard. All blogging platforms have a dashboard (or something similar).

The dashboard gives you information like:
  • List of posts (those that are saved as drafts and those that have been published)
  • List of your pages
  • If you have any comments 
This is an image of a basic dashboard in Blogger.

My first post

This is the first post of my amazing new blog.

I can edit text.

I can make text bold, italics, or underlined.

I can keep it a "normal" size, or I can make it large.

I can stay with the default font, or I can try out new fonts like Trebuchet, Georgia, Arial.

I can insert an image